Uonami in Shiinamachi is a premier spot for Tokyo night photography, famous for its layered neon signs and Showa era architecture. By using long exposure techniques and photo stacking, photographers can capture cinematic light trails that mirror the futuristic aesthetic of films like Blade Runner.
As an Amazon Associate I earn from qualifying purchases. See my full disclosure here.
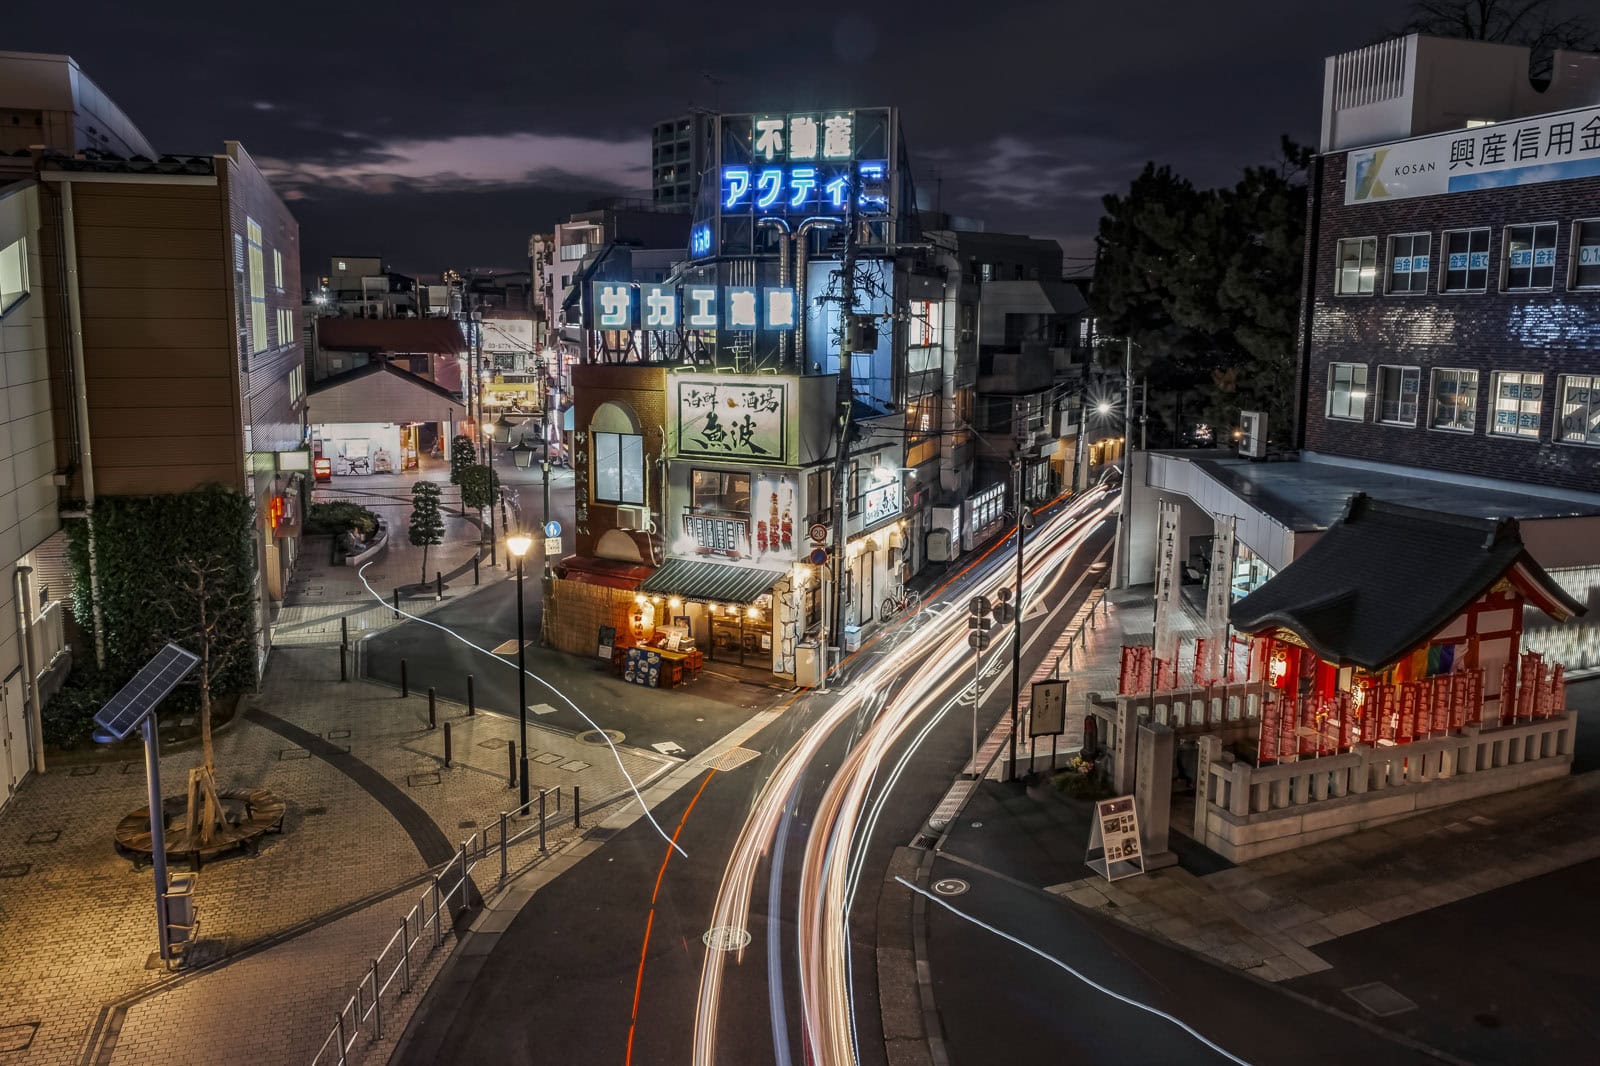
The mesmerizing neon of Tokyo, with its glowing, retro aesthetic, is a dream for many photographers. While famous spots like Kabukicho and Shibuya get most of the attention, the city hides lesser-known gems for those willing to explore. One of my favorites is a small fish restaurant with a world of character: Uonami in Shiinamachi.
Sandisk 128GB Extreme PRO SDXC UHS-I Memory Cards hold my images.
Finding Tokyo’s retro-neon aesthetic
Step out of Shiinamachi Station and you’ll immediately feel the “Showa” atmosphere, a nostalgic vibe from the post-war era when new technology and old traditions coexisted. Uonami is a perfect relic of this time. It’s a sakaba, a down-to-earth, no-frills fish restaurant where the sake is good and the food is cheap. But while the tables on the street offer a perfect spot for summer dining, it’s the building’s facade that commands a photographer’s attention.
A stunning collection of neon signs clings to the old building, pulling your eyes upward. Uonami’s lantern beckons to customers. Above it, the signs for Sakae Constructions and Actis Real Estate glow. On a rainy night, the entire scene transforms into something straight out of Blade Runner. As steam rises from the pavement and the neon glow reflects in shimmering puddles, you can almost imagine Gaff walking by with his umbrella. It’s fantastic Tokyo night photography.
A tip for first-time visitors: at first glance, the three layers of signs look like they belong to one building, but they don’t. The top sign is actually on the building behind—a simple mistake to make at night. This is the time to shoot the location, as passing cars, taxis, and bicycles leave beautiful light trails. For a different mood, try shooting a little earlier to catch the last dying embers of sunlight in the sky.
Getting to Uonami
- Address: 1-39-1 Higashiikebukuro, Toshima City, Tokyo
- It is in front of the Seibu-Ikebukuro line’s Shiinamachi Station.
- Here is the restaurant on Google Maps:
How to shoot the Uonami light trails
Uonami is near the Shuto Expressway, which has a conveniently placed bridge (marked on the map). Place your camera on its walkway. My image consists of nine images, stacked in Photoshop. How did I do that?
Gear for night photography & light trails
Before you go, have the right equipment. For the best-looking long exposure, these items are must-haves. For a more detailed breakdown of the gear, you can refer to our [How to Take Long-Exposure Photographs: A Beginner’s Guide]. But here are the basics:
- A camera with manual mode: Any DSLR or mirrorless camera.
- A tripod: Essential to keep your camera stable and your photo sharp.
- A cable release: Touching your camera during a long exposure will cause it to shake and blur your photo. So instead of pressing the shutter button, use a cable release.
- A neutral density (ND) Filter: This isn’t essential, but if the sky is bright, take an ND or a soft graduated ND filter to regulate the light. It will allow you to use slower shutter speeds.
My photography gear for this shoot
- Camera: Fujifilm X-T3
- Lens: Fujifilm XF 16-55 mm F2.8 R LM WR
- Tripod
- Cable release
Taking the Uonami photo
Starting camera settings
Set your camera to Manual Mode (M) and use these settings as your starting point:
- Focus: Switch your lens to Manual Focus (MF). Set your focus in your camera’s live view until the scene is sharp. My focus point is Uonami. Once set, don’t touch it again.
- ISO: 200 (or your camera’s lowest native ISO).
- Aperture: f/11 to f/16. This keeps the entire scene sharp and creates nice starbursts from the streetlights.
- Shutter Speed: Start with 5 seconds. Adjust longer for smoother trails or shorter if the image is too bright or dark. Remember to use your cable release to activate the shutter. Don’t touch your camera while it’s taking photos. Avoid anything that could shake it.
- Watch your highlights. Don’t blow them out on the neon signs.
How to stack photos in Photoshop”
Photo stacking is the secret to a frame packed with dense, overlapping light trails. A single long exposure might only capture a few vehicles. By blending multiple shots, you can create a “river of light.” Here’s the easy way to do it in Adobe Photoshop:
- Take as many photos back-to-back as you want using the settings above.
- Once at your computer, load Photoshop. Go to File > Scripts > Load Files into Stack.
- Find and select your images. Check the two boxes. One says, “Attempt to Automatically Align Source Images.” The other is “Create Smart Object after loading layers.”
- Once loaded, select all layers in the Layers panel.
- Go to Layer > Smart Objects > Convert to Smart Object.
- Finally, go to Layer > Smart Objects > Stack Mode > Maximum.
And that’s it! Once Photoshop has done its magic, you should have an amazing image. Carry out more edits if they are warranted.
Is Tokyo’s sci-fi nightscape worth it?
The Uonami photo is a mini-scene from Blade Runner. It is a must-take “Tokyo neon” photo for long-exposure fans. While I’m happy with this shot from my first visit, I’m already planning a return. I know I can improve it. A clearer sky or getting the last deep blue of twilight could add more drama to the background.
I hope this guide helps you get this sci-fi photo. Uonami is waiting for photographers from all over the world. See its official website here.


